
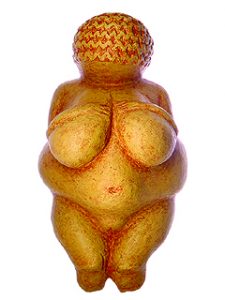
„Do I need to introduce myself? I’m Mrs. W. W. Despite being locked-up in a safe for a hundred years, ever since I was found on that fateful day in 1908, archaeologists have been talking about my figure and speculating about my age. Not the done thing of course – but you know what people are! W. W. stands for Willendorf in the Wachau, which is the name of the village where I was found. But a hamlet, because of me it is one of the more often heard of places in Austria.

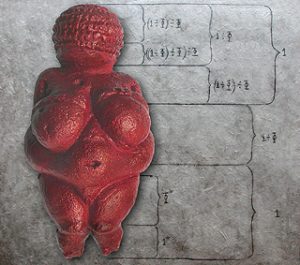
I was made some 30,000 years ago and was carried around a lot. One day the group of Ice Age hunter-gathers I was traveling with, camped on the South-facing slopes of the river’s northern banks. When they broke camp, they inadvertently left me behind. Displayed in Room 11 of the Natural History Museum in Vienna I am an outstanding example of the female statuettes which typify what archaeologists call „Gravettian culture“. Originally I was painted with red orchre. The colour of blood, this stood for life and survival. Thus at Reloading Humanism, I am an emblem of life and our precious and highly precarious future. Say what you want about my figure, but my proportions are those of the Golden Section and when it comes to aesthetics, you can’t get better then that!
Moreover, although people think I’m big in every way, in fact I’m only 11 cm (4 3/4“) tall and I don’t weigh much either. In spite of the fact that I date from an age before writing, by combining scientific insights with comparative techniques from the humanities, you can come to understand something of me and the world in which I lived. For a brief introduction to the Ice Age, see the News and Wachau Tips article, An Ice Age Corridor. If you want more in-depth information get the Reloading Humanism Guide, The Venus of Willendorf and the Culture of the Gravette, which along with online ordering options is previewed on the Books & Music page.
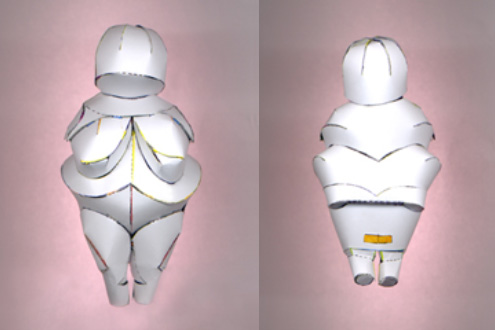
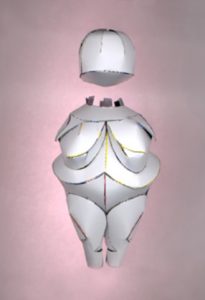
At the end of the book there is a paper model of me, with shapes that can be folded into the three dimensions!
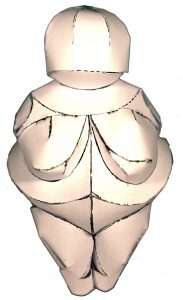
For an illustrated step by step guide to assembly, click on the toggle title below.
making the venus of willendorf paper model
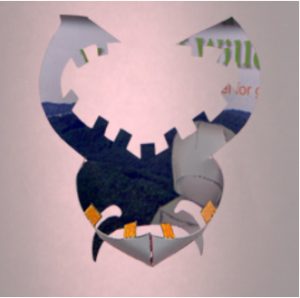
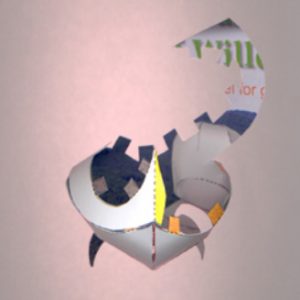
To make the model, remove the appropriate pages from the Reloading Humanism Guide, The Venus of Willendorf and the Culture of the Gravette and cutting out the smaller part of Shape 2, glue it to the larger part to complete the shape. Stick this shape and the shapes on the other pages onto paper or thin card (maximum 130 gsm) and then cut the shapes out:

In Shapes 1-3 make incisions by cutting along the black, grey and coloured lines at the points indicated by arrows. As the key to the figure is its back and rump, in assembling the figure, it is necessary to start here, folding and bending the arms of the „x“ shape to create curving belts of form.
Once the red tabs have been bent inwards, the lower arms are brought round so that they can be joined at the red line. To do this they must be bent inwards at the edges to give the buldging curve of the lower stomach, and can then be affixed to one another by applying adhesive to the red tabs and aligning along the central line.
 Once securely affixed, the orange tabs sticking upwards are turned inwards and adhesive applied. The yellow area of the right arm is folded sharply inwards and the two arms are brought down and following the curves of the hips, are joined to the orange tabs. Aligned with the curve of the lower form, the two ends can be affixed to each other along the yellow line.
The lower half of the grey area at the bottom of Shape 1 is then folded inwards along the dotted line to make an inward step whilst the grey area at the top of the Shape 2 is folded outwards along the lower dotted line and upwards along the upper dotted line to make a corresponding outward step.
Once adhesive has been applied to the grey areas of the step of Shape 1, the step of Shape 2 can be placed over it to form the bottom of the rump, the grey rectangle of Shape 2 being positioned so as to match exactly with that of Shape 1.
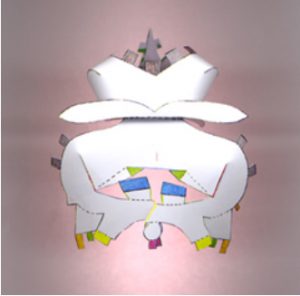
The upper legs and knees are made by pushing the two red triangles inwards and affixing them so that they are covered by the areas to which they were hitherto adjacent. These bluntly pointed forms represent the foreward buldge of the upper leg and the outer side of the lightly bent knees.

The knee-caps and thighs are made by taking the orange tabs at the bottom outermost corners and pulling them round, threading the tabs through the central slit at the back and folding downward to affix. On the inside of the legs, the thin orange tab is threaded through the slit in the triangular tab and adhesive is applied from the inside to join the two together. The grey tabs at the top of the thighs are then threaded into the corresponding slits of the stomach and are affixed.
The shape that extends from each knee is then rolled around onto itself so that the yellow tab can be affixed under the yellow line on the other side, to form a cylinder with a blue tab at the back.
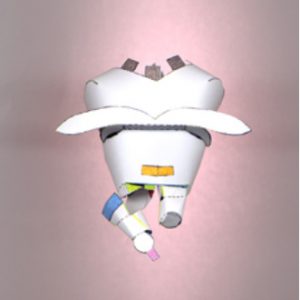
The backs of the knees are made by folding the four green tabs inwards and applying adhesive. At the back, the white triangles formed by the dotted lines, are folded lightly inwards and the green triangles pushed under the form of the upper back legs. The blue and white extensions are folded outwards along the dotted lines and adhesive is applied to the blue areas. The white areas are then placed over the green tabs whilst the blue areas are pushed under the form of the upper back legs. Thereafter the two circles that finish the lower legs are folded over, as are the violet tabs, which are affixed to the insides of the lower legs.
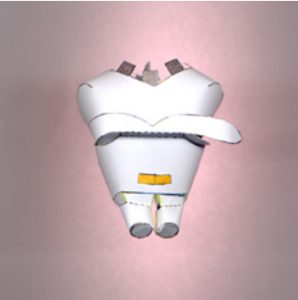
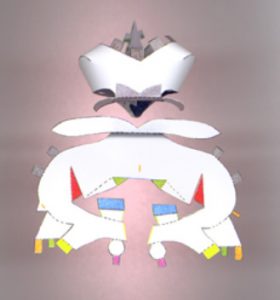
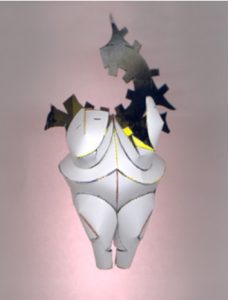
Once the legs are finished, the two curving shapes that extend outwards from the bottom of the rump can be pulled round towards the front and slotted into the gap between the top of the legs and the bottom of the hips.
To join the shape out of which the upper body will be made to the form of the lower body, the grey tabs of Shape 1 are folded upwards and outwards and adhesive is applied.
The downward pointing obtuse-angled point which forms the centre point of Shape 3 is then aligned with the open „v“ at the back of Shape 1 and the curving arms that extend outwards on either side of Shape 3, are pulled round to match the curves of the back and hips. Once aligned so that the back leans away from the rump, Shape 3 can be affixed to the three tabs at the back and to the two pairs of tabs on either side.
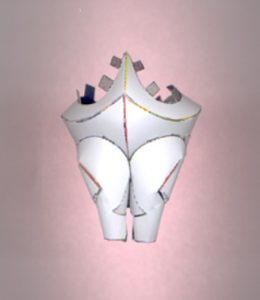
The thin triangles that form the inner sides of the breasts are then pulled upwards and round so that they can be joined to the two remaining pairs of grey tabs on each side.
At the point where the two triangles meet, the red tabs are glued to one another. As with the thighs, the buldge of the breasts are made by pushing the two orange triangles under the areas they were hitherto adjacent to and affixing.
The two yellow tabs sticking up from the sides of the breasts are then folded inwards, coated with adhesive and the buldges of the breasts pushed down and affixed to them.
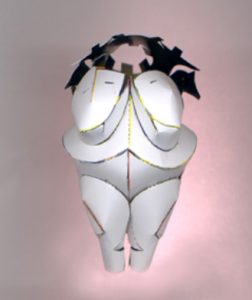
The upper body is completed by pulling the shape that extends up from the back, down and round to make a circle that is joined by means of the green tab. The front of this circle and the two triangular shapes that extend out from it are then pushed down and the two sets of blue tabs on each side are inserted into the slits at the top of the breasts and affixed.
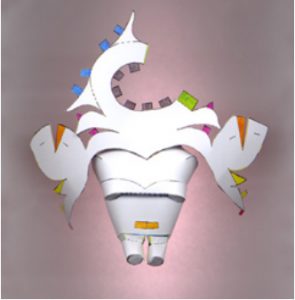
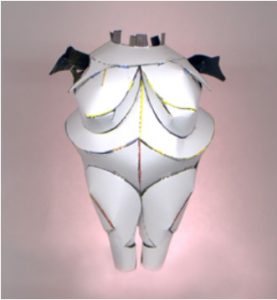 The sides of the shoulders are formed by coating the violet tabs with adhesive and pulling the crescent shapes that jut out at each side, forward and down onto the square tabs, the triangular tabs then being pushed under the larger triangles that form the front of the shoulders. At the back, the form immediately below this crescent is then pushed out from inside so that the overlap becomes a crisp edge.
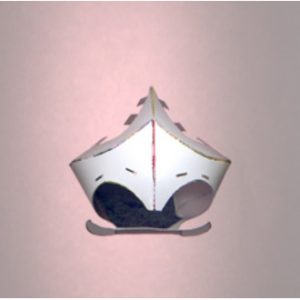
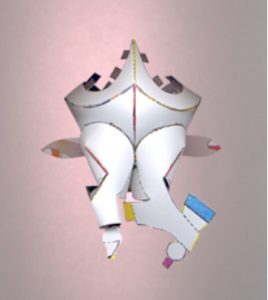
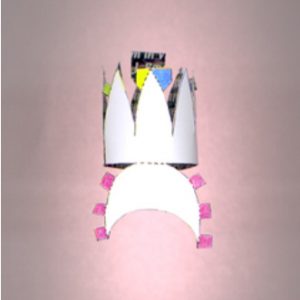 The form of the head is made by bending Shape 4 round on itself and affixing by means of the red tab. The points at the back and front of the crown thus formed are then bent down so that they overlap and can be affixed to one another by means of the orange tab.
 The yellow and blue areas on each side are coated with adhesive, as are the yellow, green and blue tabs that extend outwards from just below the points of the crown. The points are then bent downwards and affixed in the order yellow, green, blue. The face is formed by joining the violet tabs to the inside of the head so that it curves outwards and down.
 Finally, to attach the head to the body of the figure, the grey tabs around the neck and shoulders are folded upwards and coated with adhesive. Adhesive is also applied to the bottom of the head in a thin thread, along the edges of the paper. The head is then attached to the body and the figure is complete.